|
|
The DOG-MASTER® Method in ACTION |
|
PROPER USE OF THE METHOD IS ALL IMPORTANT!BEFORE YOU BEGIN
|
AN ILLUSTRATION OF A ONE-CONDITIONING SEQUENCETEACHING "COME"
Please note that only the basic steps are presented here, just to give you a general idea of the DOG-MASTER® method in action. The BOOK gives you the COMPLETE details of this most important teaching step, such as what to do if the dog does not respond at first, or if the dog runs around while you are speaking the commands, etc. So in no way is this illustration meant to replace the BOOK. The book is still your most important guide and resource.
|
||||||||||
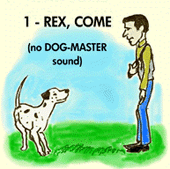
STEP 1
Substituting your dog's name for Rex, say "Rex, COME." Put slight emphasis on "Come." Avoid sounding insistent or demanding. DO NOT sound the DOG-MASTER® instrument. Time Duration: One (1) second or less.
|
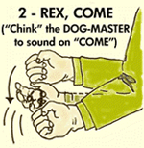
STEP 2
"Rex, COME!" Quick shake or "CHINK" the DOG-MASTER® at the EXACT SAME MOMENT you speak the word COME. Time Duration: One (1) second or less.
|
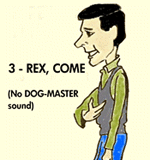
STEP 3
"Rex, COME!" Do not sound the DOG-MASTER® instrument. This is the exact same step as in Step 1. Do not bypass step 3, as a lot of people tend to do so. That is why it's important to practice first. Time duration: One (1) second or less.
|
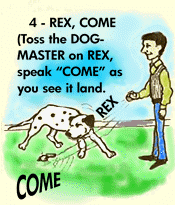 STEP 4."Rex..... COME!" Toss the DOG-MASTER instrument toward your dog as you say “Rex.” Then speak “COME” at the instant you see it land. This takes your word COME to your dog, like an invisible leash in its effect. If your dog looks at the DOG-MASTER, your timing was off—your word did not reach your dog simultaneously as the sound did. But if your dog looks immediately at YOU instead, you’re right on time. Praise your dog for ANY first response. Time Duration: One (1) second or less.
|
||
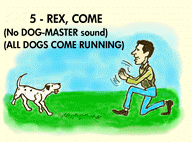 STEP 5."Rex, COME!" Crouch down to your dog's level. Clap your hand as dog comes running toward YOU! Praise your dog on any sign of a response, even if he/she does not come to you. Get ready to repeat this same sequence. Time Duration: One (1) second or less. TOTAL TIME DURATION FROM STEPS 1 THRU 5: Five (5) seconds or less
NOTE THAT whether your dog comes to you or not at the end of this one sequence, you will notice that you no longer have the DOG-MASTER® instrument in your hand, because you tossed it toward your dog on step 4. However, you will need another instrument in your hand in order to repeat the sequence over and over until your dog is responding well.
If you started with more than one instrument in your pocket, DO NOT WALK OVER TO PICK UP the instrument as this will cause you to lose your rhythm and will make YOU come to the DOG instead of the DOG coming to YOU. That is NOT YOUR GOAL. Instead, take out the next instrument from your pocket or apron and use that for the next sequence. THIS IS WHY WE RECOMMEND HAVING AS MANY AS FOUR INSTRUMENTS WHEN YOU ARE JUST BEGINNING WITH THE INITIAL CONDITIONING OF YOUR DOG.
After your dog is responding well, you try different locations and you increase the distance, selecting just the right instrument (an M-1, M-2, M-3, or M-4) for the conditions, and making sure that the instrument can reach your dog, wherever your dog may be. You progress from four instruments to one, then none. |
||
<<NEXT TOPIC: WHY CHOOSE DOG-MASTER®? >>
Copyright©2011-2012 All Rights Reserved
DOG-MASTER LEARNING SYSTEM